Thursday, December 15, 2011

The perfect gift for a reader


This is actually the first piece of jewelry I've ever made. I saw this idea on pinterest and fell in love. I love to read but I especially love going back to my favorite books and rereading them. It's comforting to revisit all my favorite characters and stories. Maybe a lot like how my little 4 year old will watch her favorite movies over and over and over again. As I write this she is watching A Charlie Brown Christmas for the 3rd time in a row (she's sick so we are having a TV and pajama day).

I had a hard time deciding what book to use for this project but I ultimately decided that Lizzy and Darcy were my favorite. I also considered something from Harry Potter, Lord of the Rings, Jane Eyre (a very close second) and yes even Twilight (but only for a second). I could make more and carry all my favorite literally characters around my neck, depending on my mood.


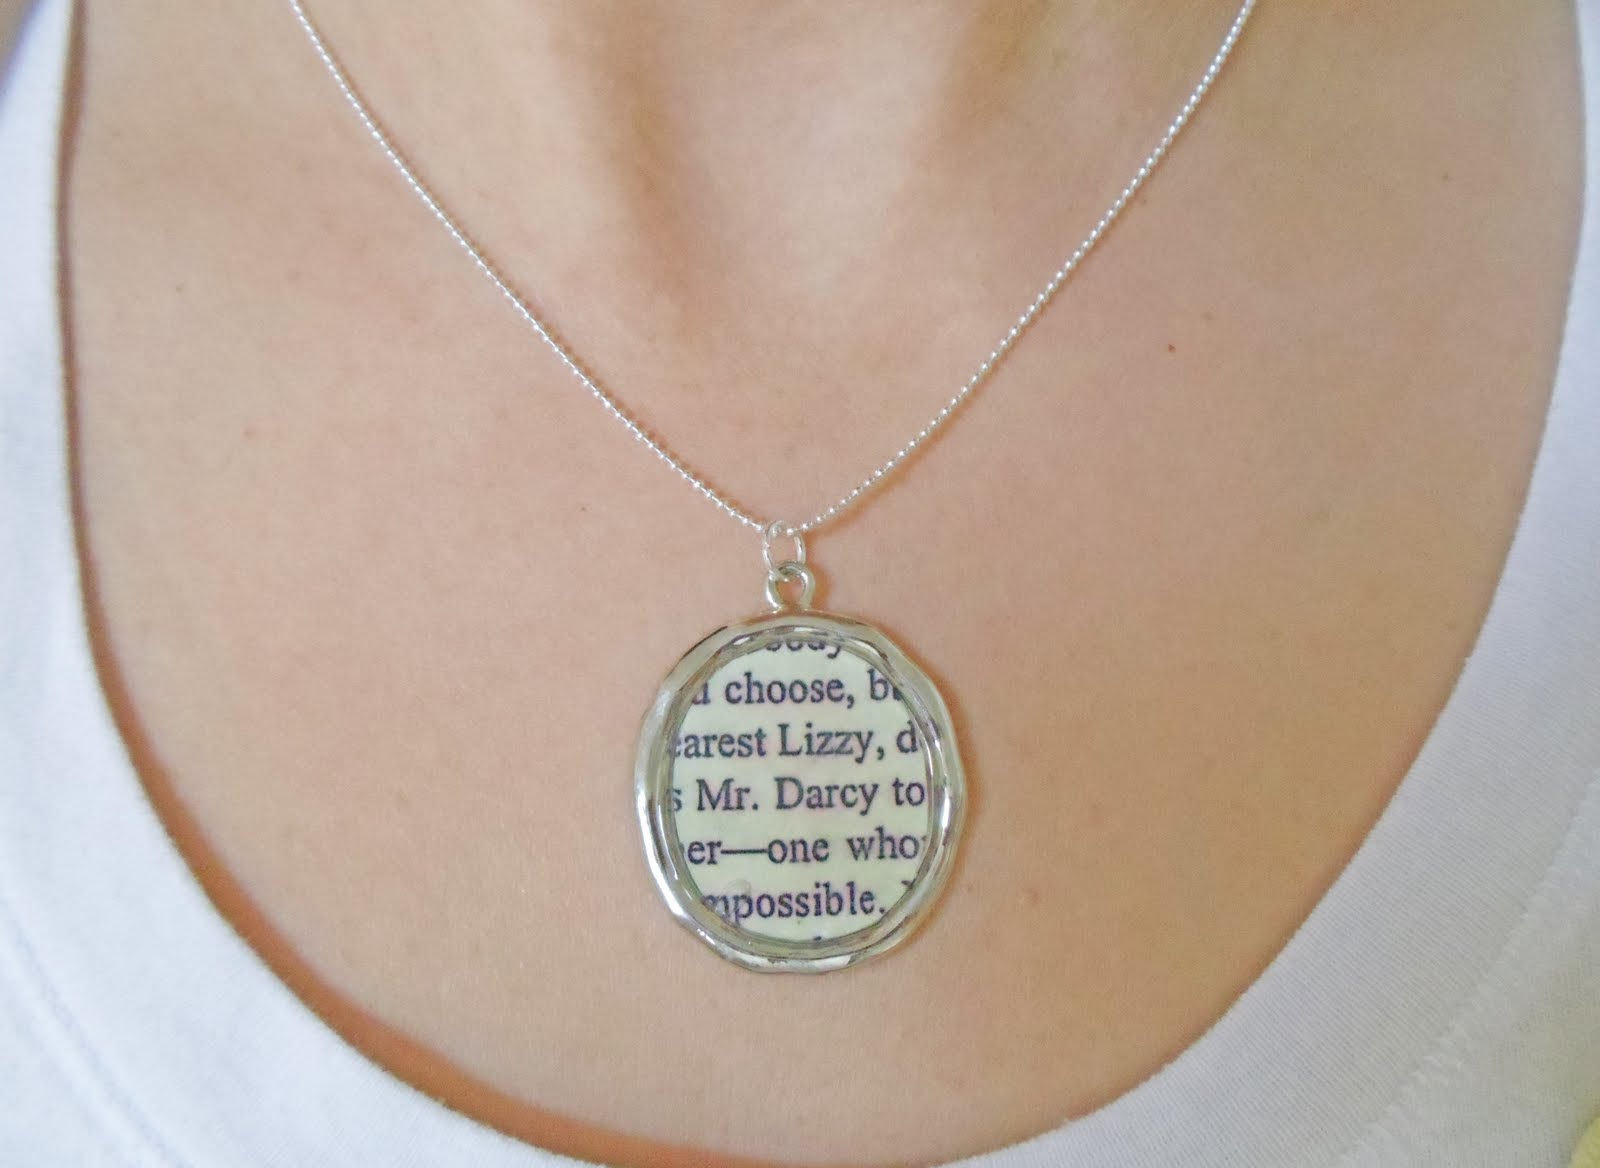
All I did was make a photocopy of a page out my very well loved and reread book, Pride and Prejudice. It took me a minute to find the perfect bit of text, but I really liked this one with both "dearest Lizzy" and "Mr. Darcy" so close to each other.


I used this Diamond Glaze stuff that I've had on hand to adhere and seal my text to the jewelry. I found this little charm at my local craft store. It actually had something else attached, a little picture of a bird I think, but it was so cheap it peeled right off.


My husband and I both love to read. I think it was one thing (one of the many) that made us fall in love, our common love of books. We have a seriously cool collection of old books on our book self. Some of these books date back to the 1800's. It's one of my favorite things in our home.


Tuesday, December 6, 2011

Silhouette Ornaments


Just wanted to show off this cute Christmas ornament I made. That's my little P, my 7 year old, my middle child. I'm excited to have used photoshop for something creative! I made ornaments of my other 2 children as well but I think hers turned out the best.

Also I wanted to share this really neat idea I found on Pinterest. We will be starting this in our little family on the 13th of December. I'm going to be a little selfish this year and instead of doing the 12 days of Christmas for a neighbor I'm going to keep it in our family and do it with the children.

Sunday, December 4, 2011

PJ pants for adults...


First off I want to say thank you for all the love I've been getting on my Christmas Pajama Pants Tutorial! It's been great reading all the comments and knowing I helped make everyones Christmas a little more homemade.

I've gotten a lot of questions about making adult sized pajama pants. I did make myself a pair once but honestly they didn't last long. I hesitate making them for me because a womens body has a lot more curves than a childs, and those curves are hard to work around. I consider myself a fairly medium sized person, but I have had 3 kids so the backside isn't as "toned" as it used to be :)

The basic idea for the adult size is you'll want to get enough fabric inches for the length of your leg, twice. I measured a pair of my most comfortable yoga pants and for me this is just over 2 yards. My yoga pants at their widest point are about 23", add a seam allowance and 44" wide fabric is just short of what I needed to get 2 legs out of one width of fabric. Since the legs of my yoga pants measured 36 inches long (and they are a bit long on me, but I like it that way) I bought that, twice. *Don't forget to add a seam allowance for the top and bottom, so to be safe I'd add about 4 or 5 inches to each leg. * Now, I think it best, because we all have wonderful curves to be proud of, you make adult women sized pants out of something with a bit of strech. That was the problem I had when I made a pair of pants for me and they eventually ripped along the seams.

I hope that answers some questions. The construction of the pants are the same for adults and I think if you used jersy knit or even fleece you'd have a more comfortable pair of pants that would fit a women better. If you just have to have those beautiful cotton fabrics though (that would be me) just make them roomy enough in the seat and they should work out, especailly if you reinforce your stitches along the crotch.

Friday, December 2, 2011

So be good for GOODNESS SAKE!

Is it just my kids who go a little nuts this time of year? I thought not. The "Santa's watching" thing only lasts for a moment and then they are back to WILD delight about the coming holiday.


So this year, in hopes of positive reinforcement, we are counting up the times the kids have been good. Santa will see our paper chain on Christmas Eve and is sure to be impressed!


The kids are super excited that it's almost reached to ground already, but I'm hoping by the 24th we'll have it wrapped around the kitchen. Every little good deed, from eating all their dinner, to letting mom and dad sleep in Saturday morning, to an A on a spelling test, gets an added chain.


Tuesday, November 29, 2011

Breezy Pinwheels


So I know it's just a quilt top, but knowing me the way I do, I'm pretty certain it won't get quilted until after the holidays. In fact, I'm pretty surprised I was able to find the time to finish up the top this time of year. But I didn't want to wait to show you, because I think it could be my favorite quilt.


I took the red pieces out of my layer cake of Sherbet Pips and I think it turned out to be a really sweet color scheme. And then those little pinwheels remind me of spring, something I'm ALREADY longing for!

How adorable is Aneela Hoey's next line coming out this February, A Walk in the Woods?!


Since I just finished up this quilt top, I'm thinking something different for this line. Maybe little matching messager bags... I've been thinking about putting together a tutorial for a child sized one.

Friday, November 18, 2011

Winner! and 100THANKS

And the winner is of the crochet ear warmer is...


#8 Angie Schlenz!
Congratulations Angie! And yes, I do remember meeting you once apon a time :) Check your inbox for my email.
Thank you guys so much for entering the giveaway and reading my blog and being my friends and giving me someone to connect to from here in lonely stay-at-home mommyland! I started this blog because I needed to reach out and know that there was a few people out there who would notice my creative adventures.
I wish I could make crochet ear warmers and send them out to all of you! But since my time and budget won't allow for that right now, I am offering a discount to my favorite followers. Just type in this coupon code when you are checking out at my etsy site
100THANKS
To recieve 20% off!
This coupon code will be valid for this weekend only, so hurry over!


In case you were wondering how I chose the winner, I used this sites random number generator, but for the life of me I couldn't figure out how to post the results on my blog.

Tuesday, November 15, 2011

100 Follower Celebration Giveaway!


110 followers to be exact. I'm pretty excited about this! Who knew that people would actually want to read my ramblings? I want to thank you guys for being such great followers by doing a little giveaway!

If you head on over to my etsy shop you'll notice I listed some crochet ear warmer headbands for sale. I'm loving crochet and I think these ear warmers are way cute. The big flower and fun buttons make them super fashionable right now.


So, in celebration of passing the 100 mark on my followers list and finally having something to list on my etsy site, I'm going to give away not just one but TWO crochet ear warmers! One lucky winner will receive a Mommy and Me ear warmer set. One ear warmer for you and a matching one for your special little girl.


The child size should fit a little girl 3 to 10 years old. It has two buttons in the back to adjust the size. The adult size is also adjustable.

OK, are you ready? Here's how to enter my giveaway...
Leave me a comment after this post and tell me a little something about yourself so I can get to know all my followers better. What's your favorite craft? Are you working on any fun projects right now? Something simple but something fun. On Friday I'll use a random number generator to pick one of your comments and the winner for the ear warmer set! Be sure and leave your email address so I can get ahold of you to let you know you won.
This week while you're waiting to hear how lucky you are, go check out my etsy site and my other ear warmer options. I'm offering these custom order, so you can choose a color to match your favorite winter coat or sweater.
Thank you so much guys for sharing with me this fun passion of creating. And stay tuned, I have a super cute quilt top just about finished!

Friday, November 11, 2011

Mushroom Christmas Tree Ornament

Pretty cute, huh? It was actually made to be a pin cushion way back in the spring, but it never made it to the blog. It sat there looking sweet on my self in the office for a few months, then the girls got ahold of it and played with it for awhile. Now I've taken it back, hung it on a bit of mini rick rack and plan to make a few more to hang on the Christmas tree this year.

No, my Christmas tree is not up yet... we actually LIKE Thanksgiving around here. I had to dig out this mini tree from the basement to showcase what it will look like, in a few weeks, hanging on a Christmas tree.

I have a tutorial put together for you. I've also copied a pattern sheet to scribd that I'll link to. I have only recently discovered that scribd charges to download things unless you upload something yourself. I wasn't aware of this (probably because I am always uploading its never been a problem for me to download) and I apologize. I am on the hunt for someone new to use in the future who doesn't charge. I actually already downloaded this pattern a few months ago on scribd, so it's there now for those of you who can download it. I'll have my hubby (he's the one who knows how to work all that for me) download it to a better site ASAP.

But here's a few pictures to help you put it together. You'll want to first cut out 5 mushroom cap pieces out of polka dot fabric (The fabric in the picture is pink. I made a cute pink one too, but I'm going to let the girls hang on to that one. Pink doesn't match my current Christmas decor).
You'll then sew these pieces together, like I've shown below...
Once you have the mushroom cap pieces all sewn together, you'll sew that to the mushroom cap BASE. I cut my base and stem from felt. It is stiffer and you don't need to worry about fraying.
Here's a picture of me sewing the cap to the cap base...
I then cut a little hole at the bottom of the cap base. The stem of the mushroom will cover the hole so you don't need to worry about sewing it up. Just make sure you don't cut the hole to big that it won't be covered up by the stem. Now stuff the cap through the hole with a bit of fiberfill stuffing.
Now hand stitch the two short ends of the stem piece together...
and then hand stitch the stem base to the bottom of the stem...

Ugh... ugly, ugly stitches there, but you get the idea. Now stuff your stem with some fiberfill stuffing. You'll then hand sew the cap to the base with a whip stitch and sew a bit of rick rack to the top to hang your ornament. I also added a couple little felt leaves to the top... that's just because I wanted to hide my imperfections where the cap pieces came together at the top. You can do that do if you like the way it looks, or leave it off if you are better at stitching than I am :)


Mushroom Pattern

Thursday, November 10, 2011

Now in 3D!


3D is the hot thing right now, right? 3D movies, TV's, video games... I know my kids love it. Personally, 3D just gives me a dull headache for the rest of the day.


But these cute 3D pinwheel blocks are no headache :) I love the way they are turning out! I'm not going to go into too much detail about how they are made, because I am using THIS pattern to make them, but I'll tell you they are fast and easy, and a layer cake and a bit of white is all you need.


I did do a search for 3D pinwheel quilts and I found this really fun one...


I think I like it even better than mine because you don't have to sew those little triangles... they are just folded! There is a tutorial for this one on her blog HERE!

Tuesday, November 8, 2011

Saturday, October 29, 2011

Crochet and Silhouettes


Crochet is seriously hard! I finally made something though... besides countless little flowers that I have no use for. I look so goofy in this picture, but you get the idea. I used THIS pattern (check it out so you can see what the head wrap is supposed to look like, and the girl on the site makes a much better model than me) and refered back to my Crochet School over and over again. Also... I kind of gave up on the pattern and did it my own way. Crochet patterns are all written in code! It's impossible to figure out.


But I'm still excited to move on to my next project, which is going to be a white head wrap, or maybe gray, because I really don't see myself ever wearing this bright blue. I just grabbed the color for practice. I tried to give this head wrap to one of my girls, who would look much cuter in such a bold color, but it was way too big.

And my quest to figure out Photoshop... well it took a back seat to crochet once I realized how involved crochet was. But I'm coming along slowly. I made these silhouettes of my kids. They need some touch up work before they are frame-able. I used THIS tutorial to learn how to make them, and once I had my husband come sit behind me and tell me what buttons to push, they came together pretty quickly.


Have a Happy Halloween!

Friday, October 14, 2011

Some Improvement

I'm getting a little better, I think. I like my crochet flowers.


I've been going to this crochet class for a month now, but I think I've learned more from online tutorials than I have the class.

Here's a link to the class I've been following online, it's really helped me a lot.


Tuesday, October 11, 2011

Tiny Bunting

From the leftover 2 1/2 inch squares from my Ruby tablerunner, I put together an adorable little bunting.


I just ran the little triangles and mini rickrack through my sewing machine.


Sweet and simple.

Monday, October 10, 2011

A Decade of the Boy


This adorable little baby boy turned 10 yesterday...


I have to say that not only am I incredibly proud of him, but I am also a little proud of myself. I've survived 10 years of motherhood. It's not as easy as some think.

Not only is he alive and well, but he's smart, gets good grades, loves to read, is legitimately funny, and is happy, friendly and caring.


In celebration of his birthday he wanted to go to Lagoon (Utah's answer to Disneyland, though us Californians think it falls a bit short of the mark). We had a lot of fun as a family and tried really hard to forget how much it cost us to get in.

We had a small party with both sets of grandparents Sunday night. I got creative and made him a Lego cake.


The past 10 years have flown by. The next 10 will hold puberty, the teenage years, high school, driving, dating, and the beginning of a Mormon mission. Now that I know how fast 10 years can seem to a mother, I plan to enjoy every moment of them.


Like my Lego cake? I got the idea HERE


Monday, October 3, 2011

Photoshop Basics

My Button

Recently we bought a new laptop. It was way overdue. No one can ever blame us for not following the advice to "use it up, wear it out, make it do, or do without" (Boyd K. Packer) Our last computer was the old laptop that my husband used through law school. It was 10 years old! And yes, I was blogging on that old computer. It cost us 3,000$ when we bought it (an amount that was completely out of reach for young college students and got stuck on a student loan that should get paid off sometime around my husband's 80th birthday) and it was so slow and so filled up with junk that it would take most of the day just to "warm up".

Well, it turns out that kids need computers while they are in school... even 2nd and 4th graders. While Bruce and I could make do with that hunk of junk, the kids needed something better, faster, and reliable. And I figured since I like to blog and since we are buying a new laptop anyway, I might as well purchase Photoshop for it (notice silly new blog title and side bar buttons).

I'd never worked on Photoshop, but every time I ran into a tutorial for cute blog stuff, it always involved Photoshop. So I bought it without really knowing what I was doing... and I still don't. At this point I can make a picture lighter and darker, write some text over a picture and add some fun clip art (again, please notice my new blog title :) and make my pictures all crazy, weird and crooked. I know I must not be using this program to it's full potential.

So I am very happy to have found (thank you Pinterest!) what seems to be a very basic beginer course on Photoshop for bloggers. I thought I'd share. She's only on day 3, being the 3rd of October. It goes to the end of this month, at which time I may have changed up my blog title a few more times... bear with me, my mood changes very frequently.

If you are interested, you can find the 31 days of lessons on Photoshop for bloggers HERE.

My Console Table

I see a blank space and I immediately start thinking what quilt can I put there. My pretty little console table by my front door needed a table runner. Of course I knew a table runner made out of the fabric Ruby by Thimble Blossoms would look perfect there. Most of my house is decorated in Camille Roskelley's fabric anyway.


Does this table runner look familiar to you? If you own THIS BOOK then it might. I was inspired by both the Sugar Rush Quilt in her book and THIS BAG. But I wanted to make mine out of a charm pack (cheaper than a jelly roll). So I cut my 5" squares from a Ruby charm pack into 2 1/2" squares. I like the look of all those little squares, but trying to match them all up was... well, impossible. My seams don't match up much at all. Oh well, good thing I'm not a perfectionist.


To be honest, this is how my console table looks right now...


I suppose my new table runner will just have to wait until the holidays have run their course.

I got the idea for my pumpkin HERE

Wednesday, September 28, 2011

My Halloween Quilt


Last year I finished a Halloween quilt just in time to have it up for a few days before Halloween. I've been looking forward to pulling it out again. I made it for the kids mostly, I like my Halloween decor a bit more spooky.
Thank you little P for modeling for us during the 2 minutes we had before we rushed out of the door for school.
The fabric is last years Halloween fabric called Boo to You by Riley Blake Fabrics. I love the great big polka dots the most. And, as you can see I opted to use mostly the green, rather than orange, just to change it up a bit. I'm not sure if this fabric is still around, but this years Halloween fabric is very cute too.

In case you are wondering, I didn't have a pattern for this quilt. I was inspired by THIS QUILT, but wanted to use bigger pieces so the kids could see the fun characters on the fabric. For the most part I just took a large rectangle of fabric, cut it at a slight angle, mixed them up, and sewed them back together again.