Monday, February 28, 2011

Tips For Sewing With Minky


I love this fabric! It's called minky, and it is soooooo soft. I've used it in quite a few projects, from QUILTS to OWLS to SLIPPERS. But, there's no way around it, it is hard to work with. I thought I'd share what I've learned about sewing with minky in hopes that less people will make the same mistakes as me.

Tip #1
Pin A LOT! As you can see in my picture below I pinned this little owl like mad! Minky stretches, shifts and curls so the more pins the better.

Tip #2
Spray adhesive is fantastic. When I am putting minky on the back of a quilt, spray adhesive works far better than pins or basting. Check out THIS POST of mine for tips on quilting your own quilts using spray adhesive.
Tip #3
No heat! Minky does not shrink in your washer, but don't dry it in the dryer! Especially if your minky has those cute little raised dots. The heat will make you dots go flat. The same is true with an iron. Not only will your dots disappear but minky can MELT!
Tip #4
Keep a lint roller near by, minky sheds when you cut it and gets everywhere.
Tip #5
If you are sewing cotton fabric to minky, stitch with your minky side down and let your feeders guide the minky along. It works a lot better this way and the minky doesn't slip as much. A walking foot, I sure would also be great, but since I don't own one yet, you'll have to let me know :)
Tip #6
And lastly, just an idea, when you're putting minky on the back of a quilt or piecing it into a quilt, like I've done HERE, (especially a baby quilt, that you wouldn't want too bulky anyway) try skipping the batting. It will save you a little bit of money (which is nice because good minky can be pricey) and minky adds quite a bit of softness, loft and warmth on it's own.

Thursday, February 24, 2011

Making A Rolled Pillowcase

The boy has been home from school the past few weeks. He goes to a year round school and they are on a track system. He is "off track" right now... which means he's home, and bored, and forgeting all the important things he learned while he was "on track" (I don't like year round school much).

While the kids are home I try and find things to entertain them, especially in the winter. This was our project for today... a pillowcase. I made him do the whole thing, including (gasp!) using my sewing machine! He was a little angry at first because he had to turn off the video games, but it only took about 45 minutes (perfect for his attention span) and in the end he said it was "cool".


It is pretty neat to see how it quickly transforms from a rolled tube to a comfy pillowcase. This turned out to be a great first sewing project for a 9 year old boy. There's a tutorial HERE! that shows how easy a rolled pillowcase is to make.

Tuesday, February 22, 2011

Tote Bag Tutorial


Click HERE! to see my newest tutorial!

Saturday, February 19, 2011

Sewing For Children - owl pillow pattern and tutorial


One of the greatest compliments I ever recieved was from my little P. P and her friend were running wild through the house playing their games and as they passed by the door to the "office" (my sewing room) her friend stopped and asked "what is your mom doing?" (I was sitting at my sewing machine working on a quilt). P replied "Oh, she's making things. My mom's REALLY good at making things." Then the two of them ran off to contiune their play, while I was left with a very sweet moment to ponder and cherish. What more could I ask as a mother? My daughter is proud to tell her little friend about what I do.

I really enjoy making things for my children. It is so much nicer than buying toys at the store. Where is the love in that? I feel like my children appreicate what I make them as well. They watch anxiously as the little stuffed animals, quilts and clothing I have promised to them come together. I think that, even at their young age, they do notice the TIME I spent on their gift, and to a child TIME equals LOVE.

I am not a perfect mother. My children are three handfuls, and I have not yet mastered how to raise them with only 2 hands. I get sad and frustrated on a daily basis. I fall back on sewing as a way to escape. But when I sew for my Children I am not just doing their laundry, washing their dishes, or picking up their toys, I am creating something for them that is a lasting reminder of how much I really do love them.

I encourage you to make something for a child in your life. Why not start with these cute owl pillows? I am so glad I snapped a couple quick pictures before I gave them to the kids. Soon after I let them have their owls they took them outside and now they are very loved and very dirty. Awesome FREE pattern and tutorial for Owl Pillow HERE!

The kids "helping" me stuff their owl pillows :)

Thursday, February 17, 2011

Sweet Pea Quilt


Just finished this sweet little baby quilt for a very special baby who will be born this spring (NO, it's not mine! Someone else I know). I am anxiously awaiting the arrival of this little one and the trip my mom, my oldest daughter and I will be making to visit her.

Minkie, of course! Anything else on the back of a baby quilt just wouldn't do.


Perfect little bow for a perfect little girl.


Don't quilts look cute rolled up? It's how I store all my quilts, rolled up with a pretty bow.


The quilt pattern is called Sweet Pea by Thimble Blossoms. You can find it in her new book titled Simplify. I love this book, well, I love everything Camille Roskelley puts out! That girl has great style! The fabric is called Lilly and Will by Bunny Hill Designs for Moda Fabrics.

Friday, February 11, 2011

Happy Valentines Day!


In celebration of Valentines day I thought I would post some things I am IN LOVE with right now. First up is cupcakes with cream cheese frosting. Here is my favorite recipe for these simple and delicious cupcakes...

1 pkg. chocolate cake mix
1 pkg. instant chocolate pudding
1 cup sour cream
4 large eggs
1/2 cup water
1/2 cup oil
1 1/2 cup MINI chocolate chips
2 (8 ounce) pkgs. cream cheese, softened
1/2 cup butter, softened
3-4 cups powdered sugar
2 tsp. vanilla extract

Mix the first 6 ingredients together with an electric beater. Add chocolate chips. Line a cupcake pan with cupcake liners and fill with batter half way full (I always do half way full instead of 3/4 full and they turn out perfect) Cook in oven at 350 degrees for 30 minutes. Remove from oven, let cool. For cream cheese frosting, in a medium bowl, cream together the cream cheese and butter. Mix in the vanilla, then gradually stir in the powdered sugar (start with 2 cups then keep adding more until it is nice and thick).

I usually have plenty of frosting, which is good because quite a bit of it ends up getting eaten by me before they ever get on the cupcakes :)

"Free" and "cute" are 2 words that I LOVE. Here are some very cute and totally free printable Valentines. Click HERE to print them out.


I LOVE this adorable Valentines quilt by Pine Mountain Designs called Love Line. Look at the little undies hanging on the line! SO CUTE!


And lastly, I was so excited to find out last week that there is a new Jane Eyre movie coming out next month (March 11th). I LOVE this book! I can't count how many times I've read it. I think the book is quite dark and am excited to see the movie looks the same.


I hope you all find lots to FALL IN LOVE with this Valentines Day!

Wednesday, February 9, 2011

Library Tote Bag Tutorial


Learn how to make this one quick tote bag, and you can pretty much make them all. There are so many cute bag patterns out there, but most of them come from this same basic pattern. You can change up the shape a bit, make it smaller or larger, add a button or more pockets, and you'll never need to buy a bag pattern again. I have made this bag so many times that I hardly need to measure, and I definitely don't need a pattern.

I picked this fabric because, well, you know I love this fabric, but the words also reminded me of my love of reading and how much I enjoy taking my little girl to the library. So I decided I "needed" a new library bag.

Supplies:
1/2 yard for main bag fabric (words)
1/2 yard for accent strip and lining fabric
1/8 yard for handles
Fat Quarter for pockets
1 yard rick rack
1 yard Pellon 809 (you may be able to get away with only a half yard if the Pellon is 44" wide. Mine was not, so I bought a whole yard.)

First thing you need to do is decide how big you want your bag. I wanted mine to be a library tote bag, so I made sure it was roomy enough to fit a lot of books. I cut 2 pieces of my main bag fabric (one front and one back) 15" X 16" and I cut 2 lining pieces the same measurements. This gave me a finished bag of about 14" X 14".

Once you have those two pieces cut, lay them out and cut your accent stip (like you see I've cut below). I cut mine 4 1/2". Tecnically you could make this bag totally reversible. I hardly ever reverse mine because I usually choose my favorite fabric for the outside anyway, and don't have much of a desire to reverse it.


Now switch your accent stips so you are pairing the the lining fabric with the outside fabric. You can see what I have done below...


You will now sew those accent strips to the main pieces of you bag. In the picture above you only see one piece for the outside and one for the lining, but of course, you will actualy have 2 lining pieces and 2 outside pieces. Sew accent strips to all 4 pieces.


I used Pellon 809 Decor Bond to give my bag some stiffness and shape. You will definitely want to use some sort of stiffener on your bag. There are lots of different weights, depending on how stiff you want you bag. I bought mine at Pine Needles, but Joanns carries it as well, or any other fabric store chain.

You simply iron it on to the wrong side of your outside pieces. Cut it excact so you don't get sticky stuff on your iron. You can follow the directions that comes with the Pellon if you need more help.


No matter what I tried this picture just would not turn the right way for me (ugh, I hate that!) But anyway, you can see my next step is to top stitch the rick rack into place on the 2 outside piece and to add your pockets. Add as many pockets as you want, inside, outside, all over. Measure your phone, your keys, everything has a pocket, and make your bag is perfect for you. *pocket tutorial link here*


Ok, now to sew your bag together. Place your 2 outside pieces right sides together and sew down one side, along the bottom and up the other side. Leave your top OPEN. Now do the same with your lining pieces BUT leave a small opening (about 3-4 inches) in the bottom of your lining, to turn your bag right side out when you are all finished.


To make a "flat" bottom to your bag, pinch the corners like you see below (I love tutorials for this reason, I have no idea how to explain how to do this without a picture) and sew straight across, like you see in the follow picture.


Yay, no further explanation required, the picture says it all, right? Do this to the corners of your outside bag as well as your lining. Some people like to measure, I eyeball, but do try and make all 4 corners the same, your bag will look much nicer.

As you can see in the next couple pictures, I cut off that extra fabric triangle and throw it away.


Your bag bottom should look like this...


Now I hope this next picture helps you. You are going to slip your outside bag into the lining, so that RIGHT SIDES are TOGETHER. Make sure that the seams all match up with eachother, and set that aside while you make your handles.


To make my handles, I like to do it much the same as you make a binding (not a quilt binding, a clothing binding, I guess). I took a strip of fabric that was 3 X 44in (width of fabric) and ironed that in half.


Then opened that up and ironed the sides into the middle...


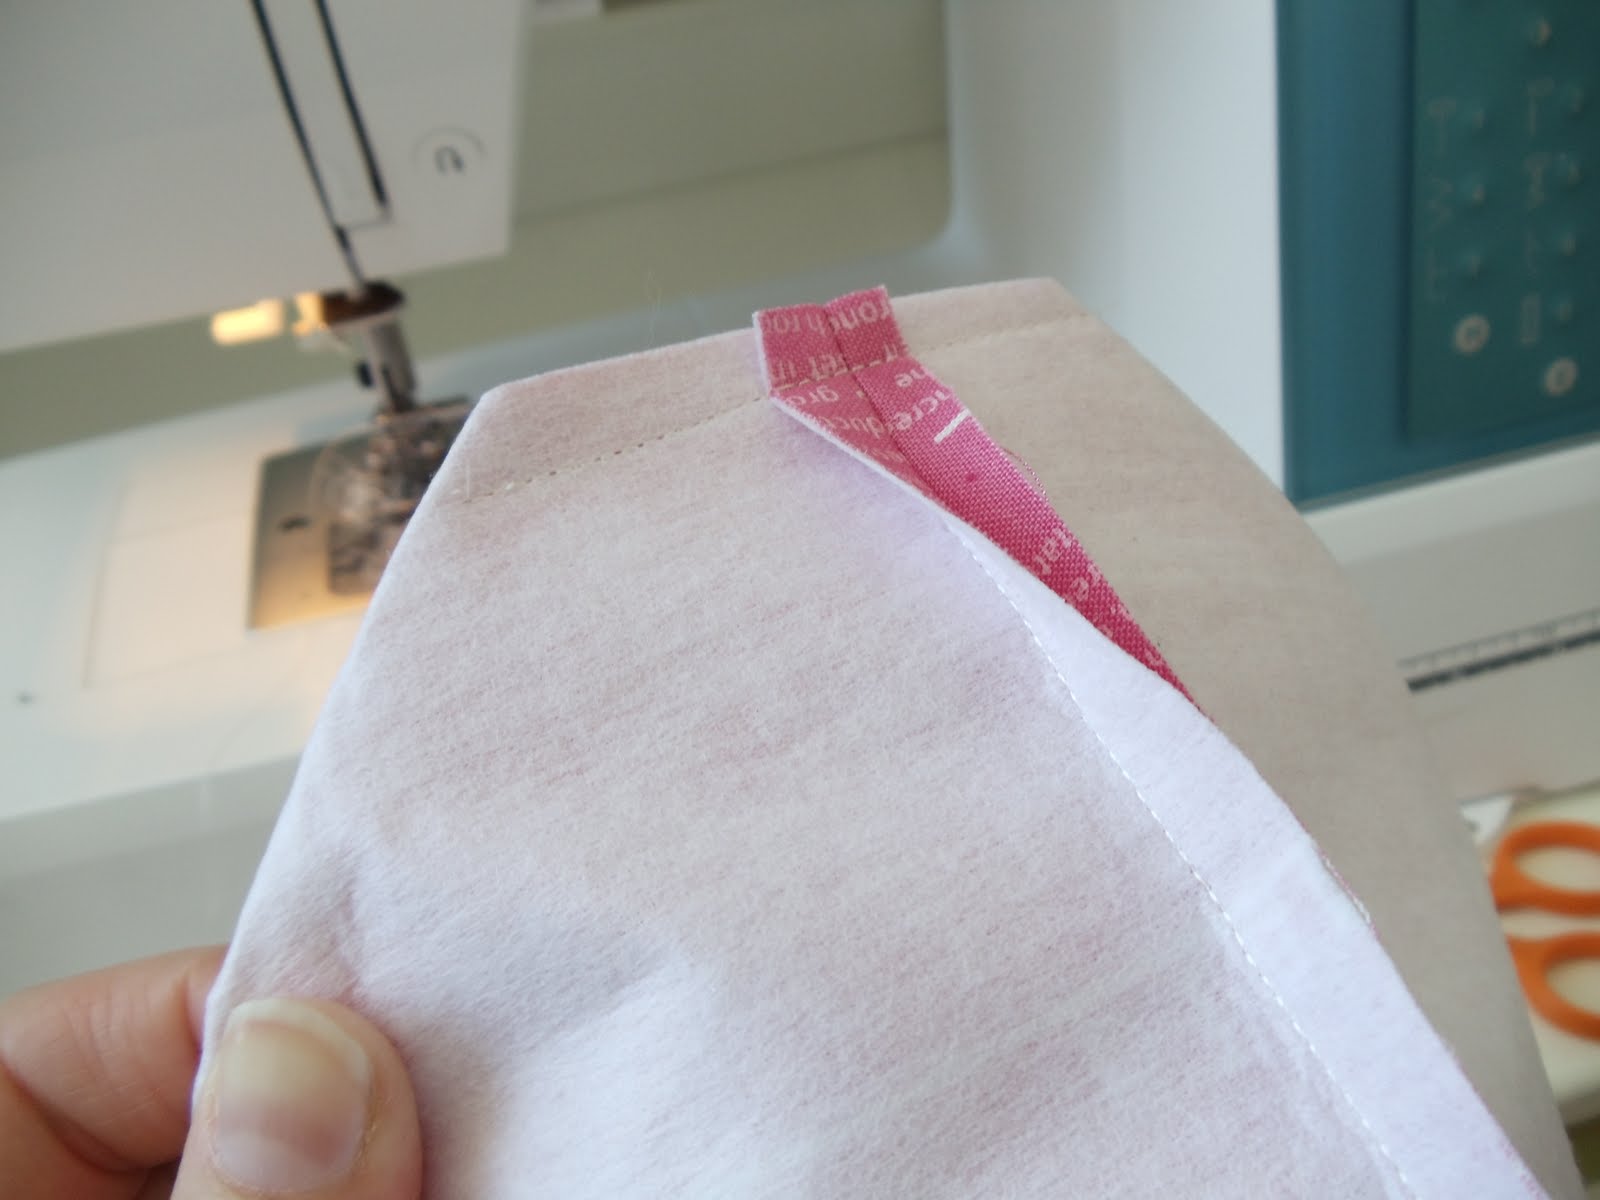
Then folded it in half one more time (on my original folded line) and top stiched all the way down both sides. Then I cut that in half, to get 2 handles. I added one of my super cute lables from Sweetwaters Label Club (see THIS POST for more information on that) so everyone knows its mine!


Grab your bag that you have set aside and slip your handles inside so they are in between the outside of your bag and the bag lining. Line up the 2 edges of each handle with the top edges of your bag...


Now sew all along the top of your bag, catching your handles as you do so.


Here's where I always get out my trusty seam ripper and make my hole to turn my bag right side out, because it never fails, I ALWAYS forget to leave that hole. Hopefully you won't, but if you do...


Now turn the whole thing right side out through that little hole and you should have something that looks like my picture below. Hand stitch the hole closed. Stuff your lining into your bag...


and top stitch along the top of your bag to hold the lining in place.


And there you have it! A super cute, one of a kind tote bag. Make one for every occasion; library, chruch, work, picnics, craft supplies, date nights...


Kimono dress


I bought THIS BOOK a few weeks ago and have been having fun stitching up these adorable little motifs during football season. I have no clue what I will do with these little cuties, but they make me smile.


And the other sunday, while getting ready for church, I pulled out this little kimono dress I made C a few months ago (it had to be on display at the shop for awhile) and thought she looked so sweet in it. She wore it to church that day, but took it off as soon as we got home "because it's itchy!"


I'd like to remake it some day in some nice linen fabric and maybe a few of the little designs from the book stitched along the bottom.

You can find the pattern I used for the dress HERE
and below is a link to one of my favorite blogs and the author of the book (yes I have linked to her before). She has lots of free embroidery patterns on her site!

Thursday, February 3, 2011


Love the birdies

Love the fabric

Love that it's FREE

Check out this super cute block of the month pattern... HERE!